This theme provides a simple way to turn articles into Wikipedia-style category banners or notices at the top of entries. The plugin takes care of the ground work without any styling except for centering the text, and you can use tags and additional campaign CSS to preset your own varied banner templates. Inspired by Ornstein’s Stub Banner plugin.
Setting up notices
- Create an article on the entry to serve as a notice. The title does not matter since it won’t be used; only the article’s content will be displayed. You can insert as little or as much content as you want and style it normally.
- In the CSS class field, give the article the notice-post class. As explained below, you can add more classes to use your own preset styles.
- Make sure that the Display option is set to "Article is expanded" and that the Visibility matches your intended users or roles.
- Save your article, then go to the Reorder articles page from the entry’s actions menu (in the top right) or via the up-and-down arrows icon next to the Overview submenu item.
- Move your notice article to the top of the list, above Description, and save. You now have a basic notice that may look similar to this on the Default theme:

Note that you can post multiple notices on the same entry. Just repeat steps 1 to 3 for each notice and order them as desired.
Simple customization
The plugin is set up to allow you to use Kanka’s default color classes alongside notice-post to quickly set the background and text color, for example notice-post bg-olive in the first screenshot below. You can find the current list of available classes on Github here and here.
You can also design your own classes to reuse as needed in your campaign’s theming, for example notice-2-cols for 2-column notices or notice-huge for a notice with very noticeable text. This way, you can focus on just writing the text of your notices in your articles and simply add an extra class to take care of frequently used styling.
Setting up templates
Since you will likely use the exact same message in several entries, it would be bothersome to copy-paste the same content every time. What I like to do is make use of transclusion to create templates as Tag entries and simply refer to those via advanced mentions. This way, if I ever want to change the wording of a notice across the entire campaign, I only need to edit one entry.
- Create a new entry. I prefer to use tags (which I organize under a parent called Notice templates), but it can be any entry that all relevant users have permission to view.
- Insert the content of your notice in the entity’s description, give it a useful title, check that the permissions are accurate and save it.
- If necessary, create styles in your campaign CSS for your various templates.
Repeat as needed. Then, when adding notices to entries, use an advanced mention to this entry instead of repeating the content:
- If your profile settings (under Appearance) are set to use advanced mentions by default (under Mentions when editing), simply start typing the name of your template after the @ or [ character and select it from the suggestions. Then, add the
field:entry parameter, so it looks like this: [tag:2882042|field:entry].
- If not, from the notice template’s actions menu, select Copy [ ] mention. Paste it into your new notice and add the
field:entry parameter, so it looks like this: [tag:2882042|field:entry].
This will transclude your template entry’s description into the article and keep it up to date at all times. You still need to specify the notice-post class on each individual article, as well as any custom classes you may have created and rely upon.
Sample templates
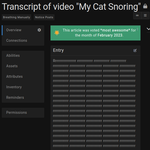
The first screenshot is a very lazy example that uses a table to display an icon on the left and a bit of text on the right. The colors are controlled by adding the bg-olive class to the article alongside notice-post.
<table>
  <tbody>
    <tr>
      <td style="font-size:20px;padding:0 10px 0 0;">🌟</td>
      <td>This article was voted <strong>*most awesome*</strong> for the month of <strong>February 2023</strong>.</td>
    </tr>
  </tbody>
</table>
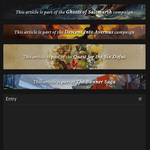
The second screenshot uses a custom adventure-banner class to set up a standard structure that can be reused for various categories of content, each of which defines its own specific background image with a dedicated class like saltmarsh.
/* Foundation for adventure banner backgrounds */
.notice-post.adventure-banner {
	background: transparent;
	border-radius: 3px;
}
/* Prepare a pseudo-element for the bg image so effects can be applied to it without affecting article content */
.notice-post.adventure-banner::before {
	content: "";
	position: absolute;
	top: 0; left: 0;
	width: 100%;
	height: 100%;
	border-radius: inherit;
}
/* Set up a grid and position elements over the background */
.notice-post.adventure-banner {
	display: grid;
	grid-template-columns: 15px auto 15px;
	grid-template-areas: "left mid right";
	min-height: 60px;
}
.notice-post.adventure-banner .post-header {
	grid-area: right;
}
.notice-post.adventure-banner .bg-box {
	grid-area: mid;
	z-index: 1;
	align-self: center;
}
/* Keep action dropdown visible on dark bg */
.notice-post .post-header .dropdown > a {
	color: white;
}
/* Common styles for main text */
.notice-post.adventure-banner p {
	color: white;
	font-size: 20px;
	font-family: "Crimson Pro", "Georgia", serif;
	font-style: italic;
	text-shadow: black 1px 2px 3px;
}
.notice-post.adventure-banner p strong {
	font-size: 22px;
	white-space: nowrap; /* optional, to prevent line breaks in important terms */
}

/* Style specific adventure banners */
.notice-post.saltmarsh::before {
	background-image: url("your-image-source.webp");
	background-size: 100%;
	background-position-y: 85%;
	filter: brightness(1.1) blur(0.5px);
}
Want to show appreciation for my plugins or request one-on-one CSS help? I accept tips on Ko-fi (no account needed):